Transplanting Cannabis: When, Why, and How to Move Your Plants for Stronger Growth
Transplanting cannabis plants is one of those skills that can quietly transform your entire grow. Done at the right time, it supports stronger root development, improves nutrient uptake, and ultimately boosts your plant’s yield potential. It’s not just about moving soil, it’s about giving your plant the space it needs to thrive.
The good news is: it’s simple when done correctly. With a little timing and a gentle touch, transplanting becomes an easy, confidence-building step that helps set the foundation for healthier growth and heavier flowering down the line.
Why Should I Transplant My Cannabis Plants?
When growing cannabis, transplanting isn’t just a routine task, it’s how you support stronger roots and smoother growth from start to finish. As weed plants mature, their roots expand quickly and can outgrow small containers faster than you might expect. Giving each plant more space at the right time keeps development steady and stress low.
If roots become crowded, growth can stall and the plant may struggle to absorb nutrients efficiently. That slowdown often shows up before flowering even begins, limiting the plant’s full potential. Transplanting helps weed plants build a solid root system that can handle the demands of bigger leaves, thicker stems, and heavier flowering sites.
It also improves overall plant stability. A well-sized container supports stronger roots, and stronger roots mean a more resilient plant throughout its growth cycle. In the end, transplanting when growing cannabis is about setting your weed plants up for healthier flowering and better results.
When Should I Transplant My Cannabis Plants Into a New Container?
Getting your timing right makes all the difference. Transplant too early and you risk slowing root growth; wait too long and young plants can become cramped in small containers. The goal is to move your plant into a bigger pot just as the roots are ready to expand, not when they’re already stressed.
Starting in small containers and transplanting once or twice actually helps build stronger root growth. When roots fill a smaller space first, they create a dense, healthy structure before expanding outward. For beginners especially, this step-by-step approach makes watering easier and reduces the risk of overwatering your new plants.
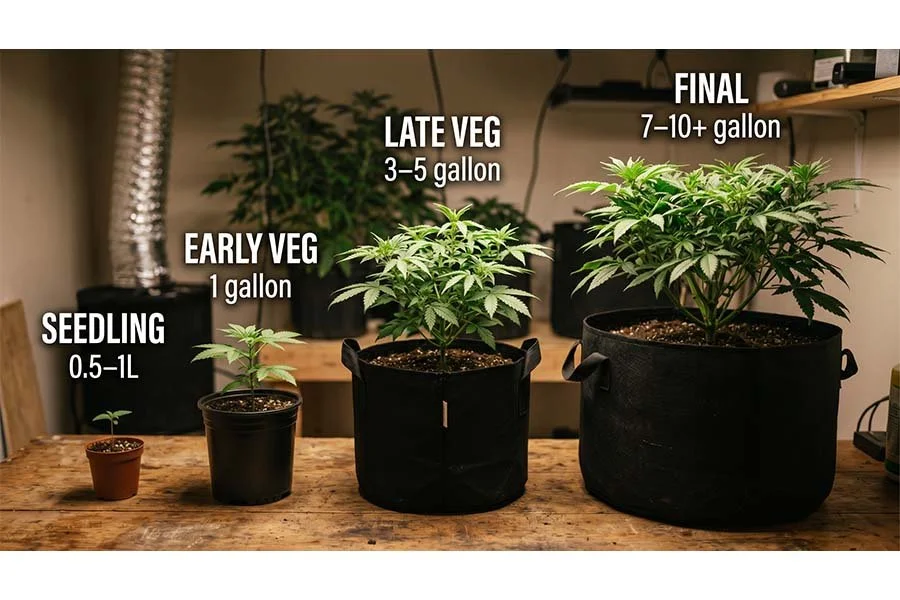
Ideal Transplant Timeline (Seedling to Vegetative Stage)
Start healthy seedlings in starter plugs or small containers to encourage tight, controlled root growth.
Once roots begin filling that space, move young plants into a 1-gallon container to support steady vegetative growth.
For indoor growers, a final move into a 3–5 gallon bigger pot is common before the flowering stage.
Outdoor growers often transplant one more time into larger containers or directly into the ground to maximize root expansion for outdoor plants.
Signs It’s Time to Transplant
Roots are poking out of the drainage holes at the bottom of the pot.
The soil dries out much faster than usual, even with consistent watering.
Growth seems to stall despite proper light and nutrients.
The plant feels top-heavy or unstable in its current container.
You can see a dense root mass circling the inside when gently removing the plant.
Can You Transplant During Flowering?
In most cases, it’s best to avoid transplanting during the flowering stage. By that point, the plant is focused on bud production rather than root growth, and stress can reduce overall performance. If absolutely necessary, be extremely gentle. But ideally, complete all container upgrades before it starts flowering.
How Can I Tell If My Cannabis Plant Is Root Bound?
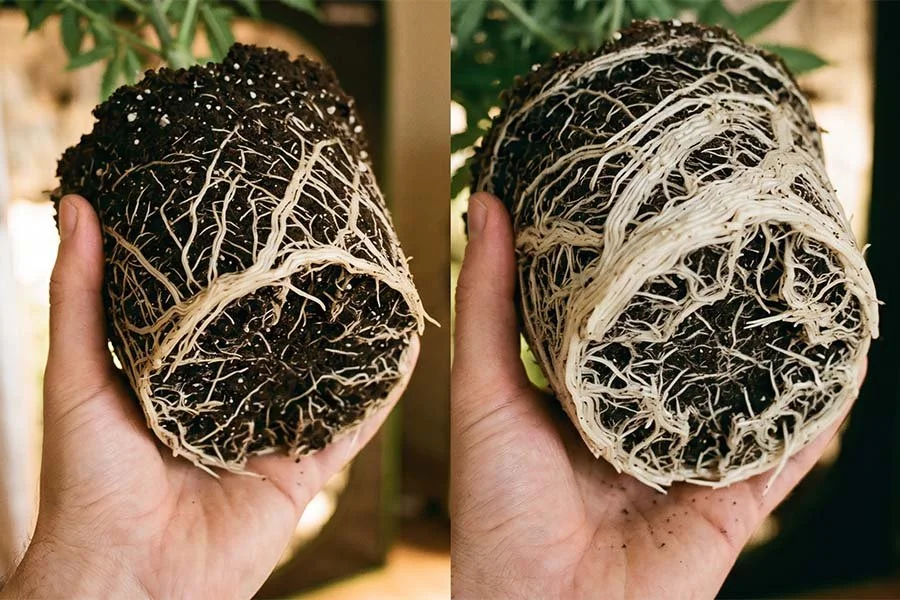
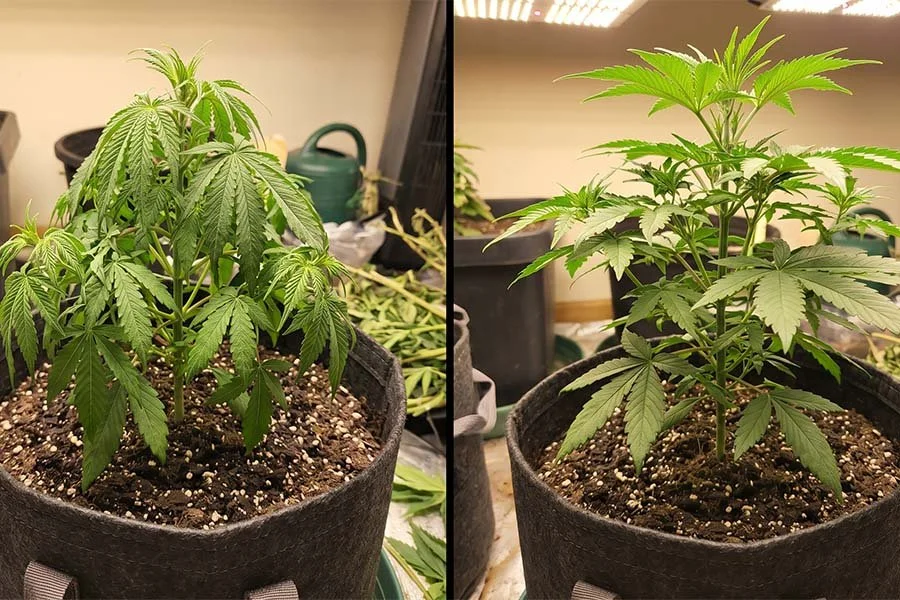
A cannabis plant becomes root bound when its roots have completely filled the container and have nowhere left to expand. Instead of developing a healthy root system that spreads through fresh soil, the roots begin circling around the inside of the pot, tangling into a dense mass.
When this happens, marijuana plants struggle to absorb water and nutrients efficiently, which can slow growth and reduce overall vigor.
A root bound plant isn’t doomed, but it is stressed. The longer roots stay confined, the more likely you are to see stalled development, watering issues, and even nutrient deficiencies that don’t improve with feeding. Catching the signs early makes transplanting much easier and helps restore a healthy root system before flowering is affected.
Visual Signs of Root Bound Cannabis Plants
Roots circling tightly around the outer edge of the soil when you slide the plant out of its pot.
A dense, compact root ball that holds the exact shape of the container.
Very little visible soil left, mostly intertwined roots.
Above-Soil Symptoms
Slowed or stalled growth despite proper light and feeding.
Leaves drooping even though watering is consistent.
Recurring nutrient deficiencies that don’t resolve with adjustments.
A plant that dries out extremely fast after each watering.
How to Transplant Cannabis (Step-by-Step Guide)
The process of transplanting cannabis is simple when you stay organized and work gently. The goal is to give roots enough space to expand without shocking the plant. No matter the size of the plant, a calm and careful approach makes all the difference.
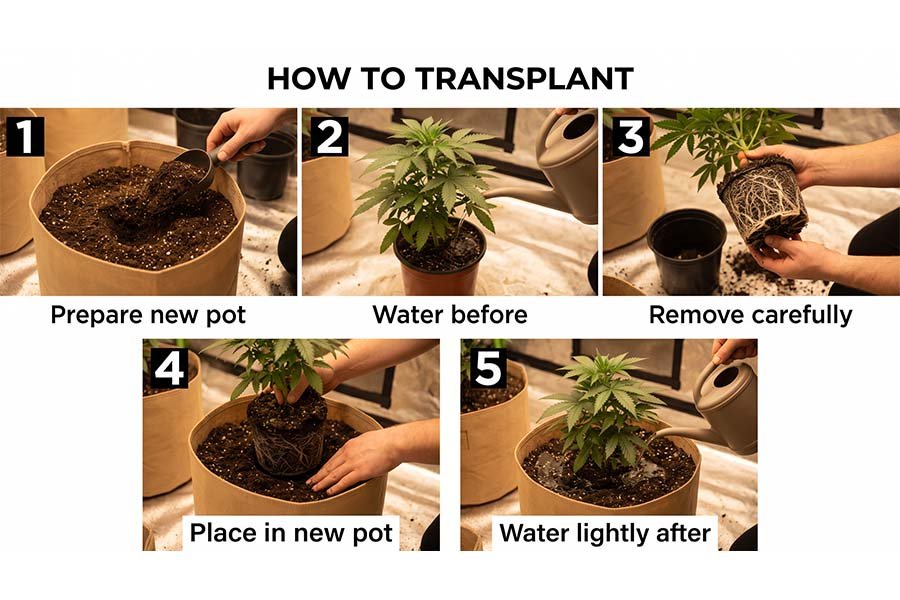
Step 1: Prepare the New Container
Fill the new pot with quality soil, leaving space in the center for the root ball. Lightly moisten the soil so it’s evenly damp but not soaked. Make sure the container has proper drainage before you begin.
Step 2: Water Before Transplanting
Water the plant a few hours before moving it. Slightly moist soil holds together better, making the process of transplanting smoother. This helps protect the root structure when removing the plant from its old container.
Step 3: Remove the Plant Carefully
Gently loosen the edges of the soil and tip the container sideways. Support the base of the plant and slide it out slowly, keeping the root ball intact. Avoid pulling upward, especially with small plants.
Step 4: Place Into the New Pot
Set the root ball into the prepared hole so the plant sits at the same depth as before. Fill in around the sides with fresh soil and lightly press to remove large air pockets. The goal is stability without compacting the soil too tightly.
Step 5: Water Lightly After Transplant
Give a moderate watering to help the soil settle around the roots. Don’t drench the container, roots need oxygen as much as moisture. Once complete, your plant now has enough room to continue healthy vegetative growth.
How to Minimize Transplant Shock
Transplant shock happens when a plant reacts to sudden environmental changes or root disturbance during the move. While some temporary drooping is normal, the goal is to keep the transition as stress free as possible. With the right approach, most plants recover quickly and continue growing without missing a beat.
Protect the Roots: The biggest cause of transplant shock is root damage. Keep the root ball intact, avoid shaking off soil unnecessarily, and handle the plant gently from start to finish.
Choose the Right Pot Size: Moving into a container that provides enough space (but not excessively more) helps roots adapt gradually. Oversized pots can hold too much moisture, which may create additional stress.
Adjust Light Intensity: After transplanting, slightly reduce light exposure for 24–48 hours. This gives the plant time to redirect energy toward root recovery instead of rapid top growth.
Water Carefully: Overwatering is one of the most common mistakes. Provide enough moisture to settle the soil, but avoid saturating it, as roots need oxygen to recover properly.
Maintain Stable Conditions: Keep temperature, humidity, and airflow consistent. A stable environment supports a smoother, more stress free transition while the roots adjust to their new space.
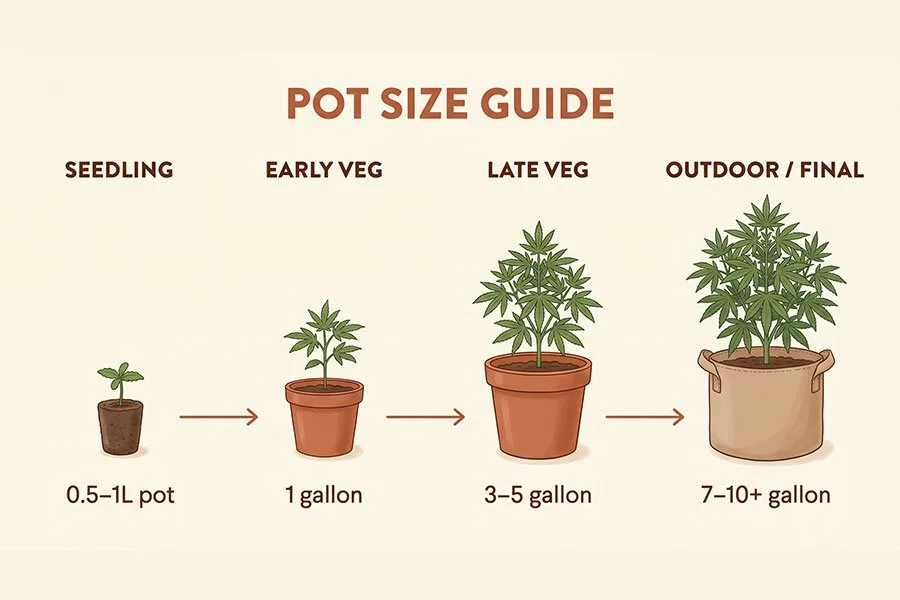
Recommended Flowerpot Sizes for Cannabis Plants
Choosing the right container size isn’t just about fitting the plant, it’s about giving young roots the right environment to develop properly at every stage. Starting too large can slow early growth, while staying in small pots too long can restrict expansion. Think of pot size as a growth tool, not just a container.
Below is a simple, stage-by-stage breakdown to make planning easier:
Seedling Stage
Container Size: Starter plugs or 0.5–1 liter small pots
Why:
Encourages compact, healthy young roots
Makes watering easier and more controlled
Reduces risk of overwatering
Early Vegetative Stage
Container Size: 1-gallon pot
Why:
Gives roots more room to expand gradually
Supports steady vertical growth and leaf development
Prepares the plant for structured training
Late Vegetative Stage (Final Pot for Many Indoor Grows)
Container Size: 3–5 gallon pots
Why:
Provides enough space for strong root mass
Supports balanced plant height and canopy development
Ideal for most indoor setups
Outdoor or Large Indoor Grows
Container Size: 7–10+ gallon bigger containers (or directly in the ground)
Why:
Maximizes root expansion
Supports larger plant height and heavier flowering
Allows the plant to develop properly without restriction
Quick Reference Guide
Short, compact plants (2–3 ft): 3-gallon pots
Medium plants (3–5 ft): 5-gallon pots
Large plants (5 ft+ or outdoor): 7–10+ gallon bigger containers
What to Do After Transplanting Cannabis
Transplanting doesn’t end once the plant is in its new container. The first few days afterward are critical, as roots adjust to their new space and begin expanding into fresh soil. A steady, patient approach helps your plant bounce back quickly and continue growing without interruption.
Monitor for Stress Signals
It’s normal to see slight drooping within the first 24 hours, but your plant should perk up fairly quickly. Keep an eye out for persistent wilting, yellowing leaves, or stalled growth. If symptoms last more than a few days, reassess watering, light intensity, and environmental conditions.
Resume Feeding Carefully
Fresh soil often contains nutrients, so there’s no need to rush into heavy feeding. Wait a few days before reintroducing fertilizers, and start with a mild solution rather than a full-strength dose. This gives roots time to settle and reduces the risk of nutrient burn.
When Growth Should Resume
In most cases, healthy plants resume active growth within 1–5 days. You may even notice faster vertical development once roots begin spreading into the new container. As long as conditions remain stable, your cannabis plant should transition smoothly into its next stage of growth.
Tips for Successful Cannabis Transplanting
Transplant During Vegetative Growth: The vegetative stage is when plants recover fastest. Avoid making major container changes once flowering has begun.
Time It Before a Growth Surge: Transplant just before your plant becomes root bound, not after. Planning ahead keeps development consistent and avoids unnecessary slowdowns.
Work in a Calm, Clean Space: Prepare everything in advance so the roots aren’t exposed for long. The faster and more organized you are, the smoother the transition.
Avoid Oversized Jumps: Moving from very small containers into extremely large pots can lead to watering issues. Gradual increases give roots time to adapt and expand naturally.
Use High-Quality, Well-Aerated Soil: Good soil structure improves drainage and oxygen flow, which helps roots establish quickly in their new container.
Don’t Compact the Soil Too Firmly: Lightly press soil into place for stability, but keep it airy. Roots need oxygen to thrive.
Label Your Plants Clearly: If you’re growing multiple strains, transplanting is a good time to double-check labels and organization.
Stay Patient After the Move: Give your plants a few days to adjust before making additional changes to nutrients, lighting, or training techniques.
Should You Transplant Autoflowers?
Because autoflowers move from seedling to flowering in just a few weeks, many growers prefer to plant them directly into their final container to avoid unnecessary stress. Since autos don’t have much recovery time, minimizing disruption early on can make a noticeable difference in overall growth.
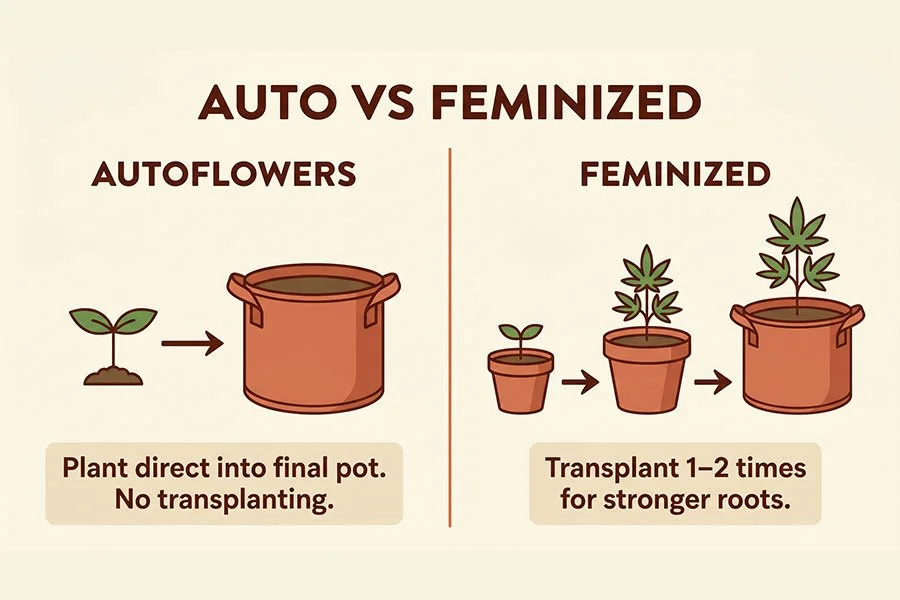
That said, you can still transplant autoflowers if needed, you just have to be precise. If you do need to transplant, make sure it happens very early, ideally within the first couple of weeks while the plant is still small and adaptable. The key is keeping the process gentle and stress-free, so the plant can stay on schedule and transition smoothly into flowering.
Common Transplanting Mistakes to Avoid
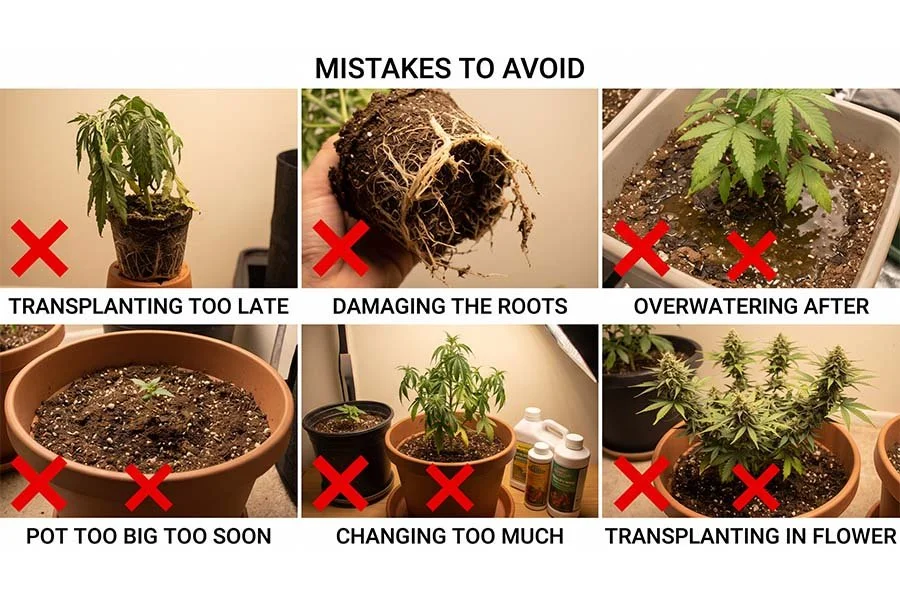
Transplanting Too Late: Waiting until a plant is severely root bound can slow recovery and stunt growth. It’s always easier to transplant slightly early than far too late.
Damaging the Root Ball: Shaking off too much soil or breaking apart roots can delay recovery. Keep the root structure intact to help the plant adjust quickly.
Overwatering Immediately After: It’s tempting to soak the new container, but oversaturated soil limits oxygen. Light, controlled watering is far more effective.
Jumping to an Oversized Pot: Moving from very small containers into extremely large ones can create drainage issues and slow root expansion. Gradual upgrades encourage healthier development.
Changing Too Many Variables at Once: Transplanting is already a stress event. Avoid adjusting lighting, nutrients, and environment all at the same time.
Transplanting During Peak Flowering: Once a plant is focused on bud production, recovery becomes harder. Complete major container changes before flowering begins whenever possible.
Final Thoughts: Transplanting Cannabis for Bigger, Healthier Harvests
Transplanting cannabis doesn’t have to feel intimidating. When you understand the timing, handle the roots gently, and move your plants up in stages, you’re simply giving them the space they need to thrive.
Healthy roots lead to stronger growth, smoother flowering, and more rewarding harvests. With the right approach—and quality genetics to begin with—you’re setting the foundation for success from the ground up.